


From Cacao Pods to Delicious Chocolate Bars, Réunion Island.
Introduction
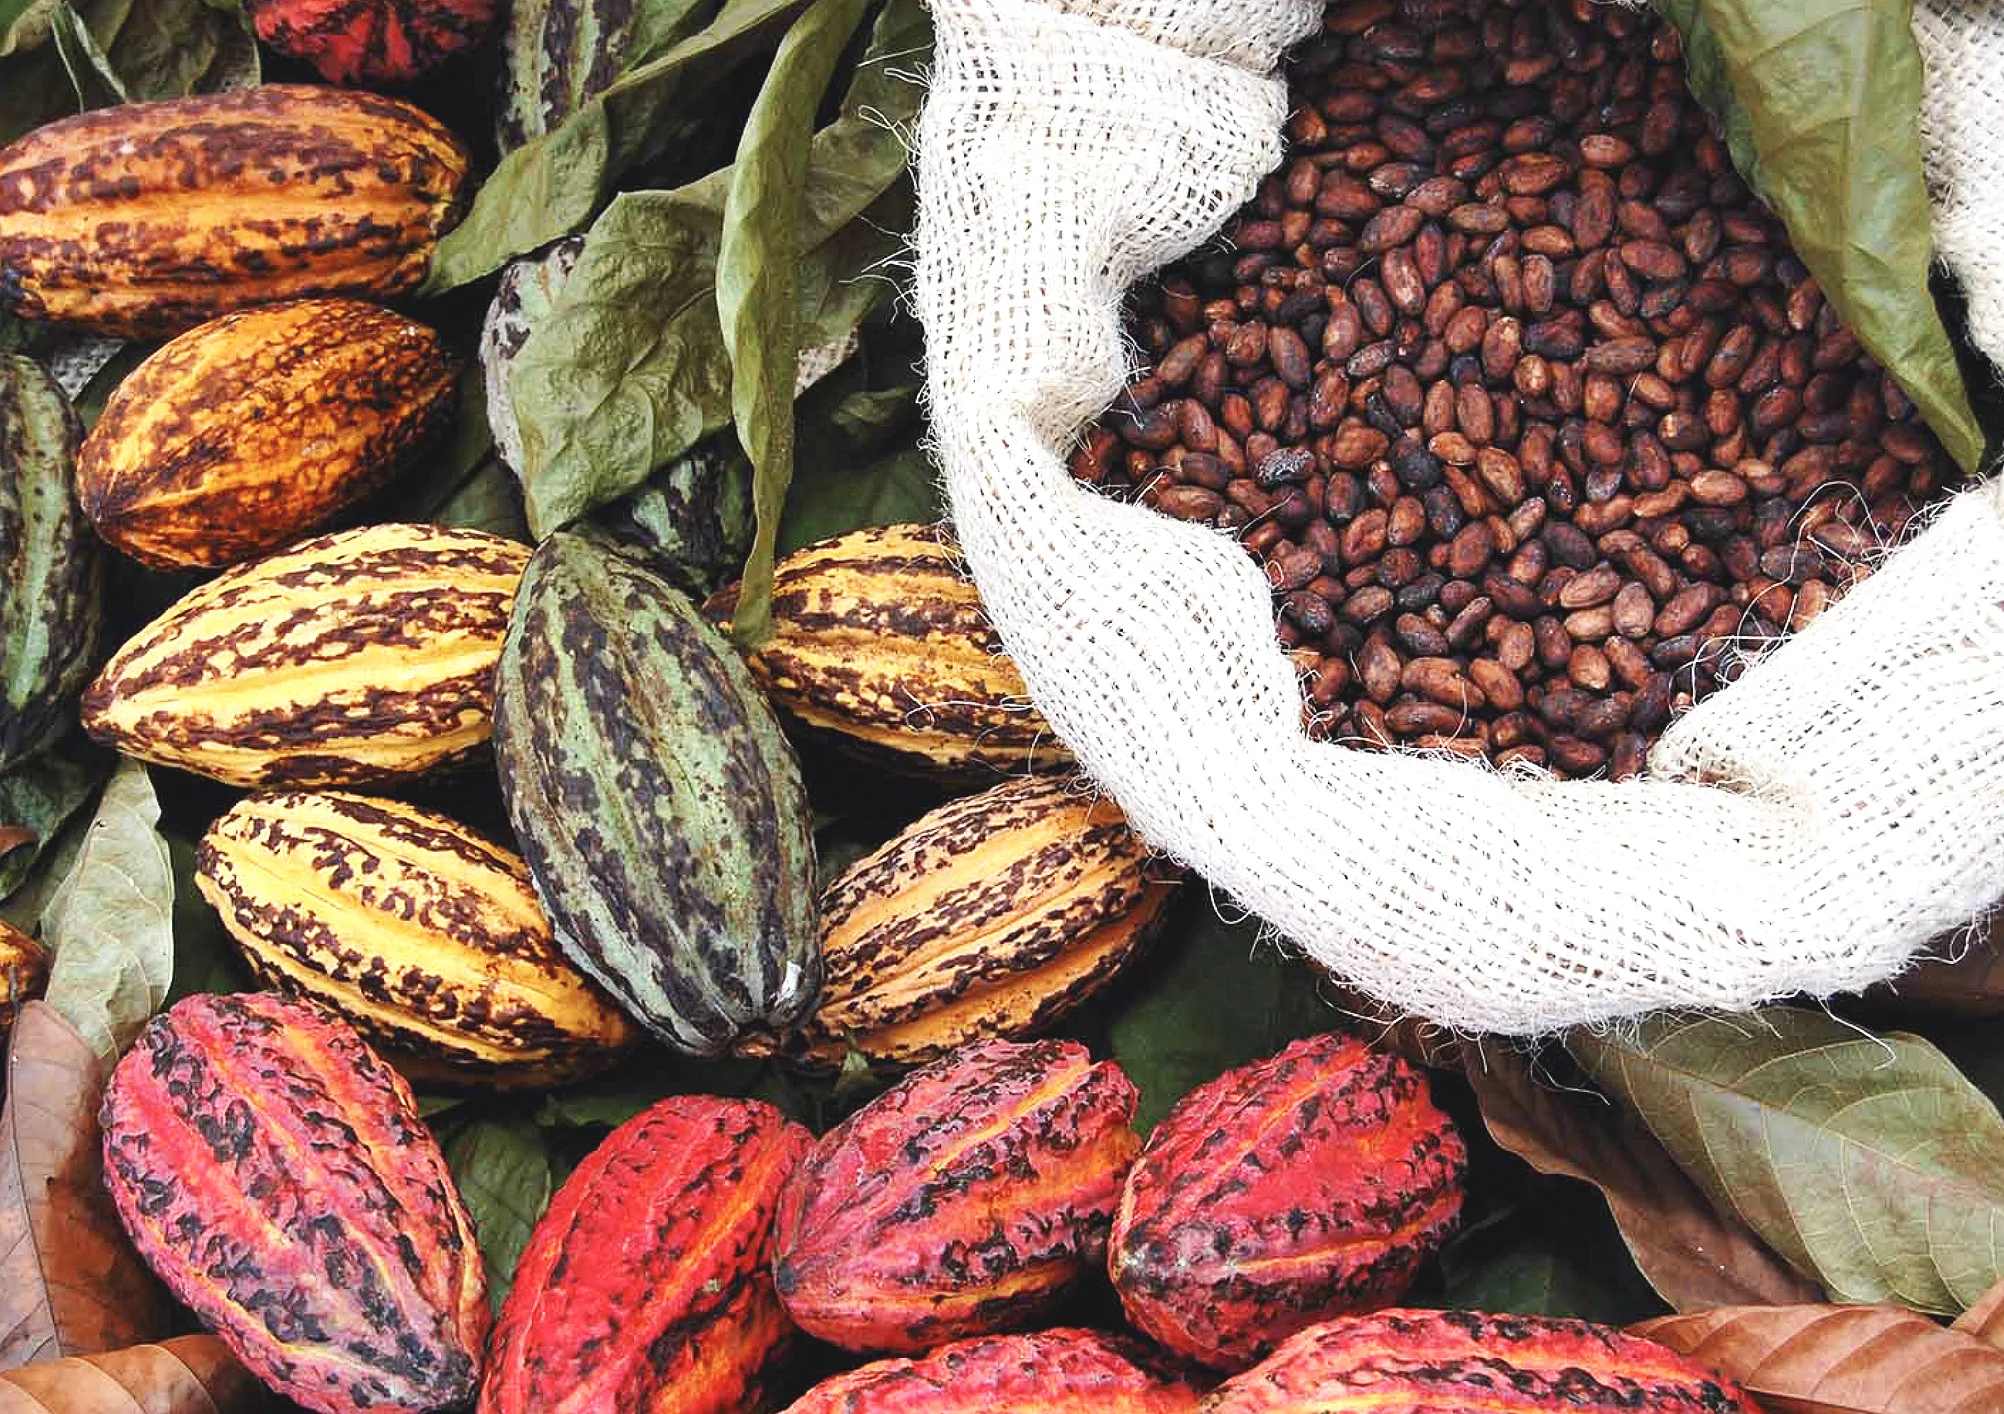
Before I was born, my father planted a couple of theobroma cacao tree also known as the cacao tree [1]. Standing about 4 to 8 meters tall the cacao tree is described as an evergreen tree and is part of the Malvaceae family which is native to tropical regions of the Americas [1]. The seeds look like a brownish fat bean and there are about 20 embedded in a weird wet and soft slime-like white pulp (apparently it is sweet and delicious to taste). All of this is found in a pod, also called a cacao pod, which is about 15 to 30 cm long and about 10 cm wide. The cacao pods take about 5 to 6 months to be ready and ripened and hence are harvested around the world twice [2].
We live on Île de la Réunion (Reunion Island) which is a French island belonging to France and has similar weather and humidity than some part of the Americas. Here I was thinking that during my childhood to adulthood I always saw those cacao trees make these beautiful cacao pods. I then thought to myself… I am going to make chocolate. Knowing enough about chemistry through my pharmacy degree, I had a little and a very fun challenge ahead of myself. So, stick along with this blog and learn with me on how to make chocolate.
I highly recommend that you watch this video titled Tree to Bar || How to Make Chocolate Every Step by Gabe Humphries. These guys were the people I watched when I attempted to make chocolate. They are very cool and they know what they are doing. Their chocolate bars look amazing and they did a really good job of making chocolate.
Step 1 - The start of this challenge has begun. First, let us find a healthy cacao tree…
This should be pretty straight forward. Go to your nearest cacao tree and grab some pods. Depending on your cacao tree species the pods need to be an orange or purple-ish or a nice red colour. Mine were purple-ish and red but a few of them were black. When the pods are black it generally means the seeds inside have all germinated or sprouted and cannot be used for the chocolate-making process. If you scratch the surface of the pod and it is still green then it is not yet ready. So after hitting the pods with a broomstick, they all fell down and I managed to get a lot of healthy good looking pods (maybe up to 20 pods).

Some of the pods are orange and yellow in colour.
Photo 1. Credit: Luis Ovalles, Wikipedia.

Notice some have a tinge of black colour. This might indicate that they have already germinated and cannot be used.
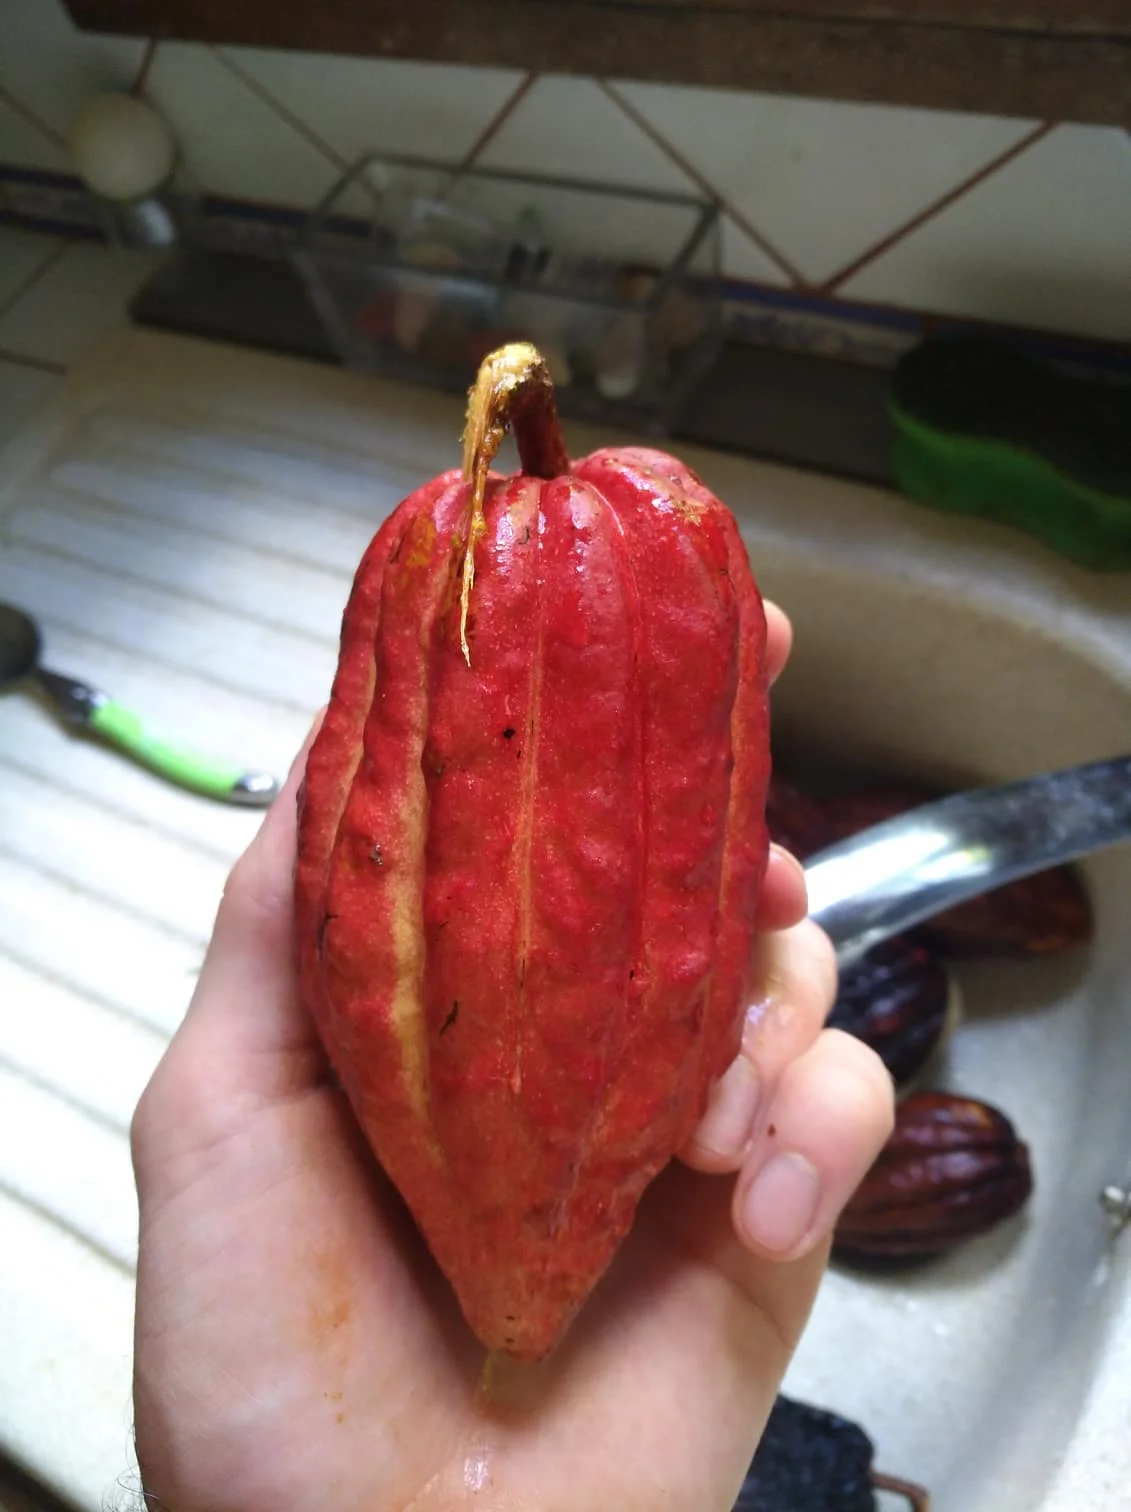
My cacao pod from the garden with a beautiful red colour. Inside should be about 15 seeds embedded in a white pulp.
Step 2 - Open and get those seeds
At this stage, I was quite excited about getting all those pods. What you need to do is to smash them with something blunt to open them up and expose the seeds covered with the white slime-like pulp. When I opened my first pod I used a knife and cut the pod in half. This can be dangerous and you may cut yourself so do not be like me and be safe. Cutting the pods with a knife might damage the seeds inside and ruin them. Also, it is very important to keep the white slime-like pulp for the fermentation process (which should the next process).

Photo 3. Credit: Marty Casado, Ambergriscaye.

Photo 2. Credit: Keith Weller, USDA.

The white pulp must be kept for the fermentation process, do not throw it way!
Photo 4. Credit: EHChocolatier Artisan Chocolates.
Step 3 - The fermentation process
There are many processes to ferment the cacao seeds. There is the hot box method or the method where you pile the seeds outside on some banana leaves and leave it there for 5-7 days. The banana leaves method needs to contain a lot of cacao seeds which you may not have and is generally done in a more tropical climate. I did the hotbox fermentation process as it was easy and suitable for the number of seeds I had.
Fermentation also known as zymology (Greek origin meaning “the workings of fermentation") is a metabolic process that uses micro-organisms and enzymes [2]. This process changes the substrates such as carbohydrates or sugars to a product which contains alcohol or lactic acid and mostly without the use of oxygen which brings a desirable change. During fermentation, ATP will be formed and a lot of heat will be released from the micro-organisms. Fermentation is an important process to get the best flavour out of your cacao seeds [3]. Tannins will be removed during the process which produces an astringent flavour to the chocolate. Making this process is essential to get the best odour and cacao flavour as the cacao seeds will mature as the white slime-like pulp will become into an alcoholic liquid (which you can drink!).
Here are the steps:
You need to add all your seeds with all the white slime-like pulp in an air-tight compartment. It will get hot and that should tell you that fermentation is going well. You do not want any sand or grit mixed with it and you do not want to add the outer pod shell (the hard-colourful shell). Do not add germinating or sprouting seeds and do not add the white pulp “backbone” (see the photo 5 and 7 below). The backbone is a unique piece that connects all the seeds together and is different from the pulp surrounding the individual seeds.
Add some activated yeast or vinegar or some water to start the process. I added water and I used a clear Tupperware. I then left it in the hot sun so the process would be faster and warmer. I added enough water so that it barely covered all my seeds.
Mix well and wait for about 5 to 7 days. Every day I mixed all the seeds thoroughly twice a day. I waited a good week just to be sure that my fermentation process went well.
I can tell you that my Tupperware got hot and I got some strong smell of alcohol. I kept the Tupperware airtight so that the alcohol wouldn’t evaporate and I added some water every now and then. Technically it is possible to drink that alcoholic cacao drink. I don’t know why I didn’t give it a go and try it but apparently, it tastes good.

This is the hot box method. At the end there should be a layer of alcohol at the bottom.
Photo 6. Credit: Gabe Humphries. Published 7th December 2017.

No germinating or sprouting seeds.
Photo 5. Credit: Gabe Humphries. Published 7th December 2017.

No white pulp “backbone”.
Photo 7. Credit: Gabe Humphries. Published 7th December 2017.
Step 4 - Time for some drying
After the fermentation, it is time to dry your seeds. It is important to ensure that no off-flavour smell or any unwanted flavour is developing. What I did is that I washed them with water (not too hard just ran some water on them) and put them on a black oven tray. I then left them in the sun for about 5 days where twice a day I would turn them over in the tray making sure they were completely dry. It is a very satisfying result to see those beans being dried up. At this stage, the beans don’t smell like cacao at all but just some fermentation and alcohol remnant smell. Apparently, the moisture content in a cacao bean needs to be reduced from 60% to 7.5% and once dried they can last up and be stored for 4-5 years [2].
Remember you can use a tarp, a mat or a patio and use a rake to dry them evenly once or twice a day for 7 days. After the drying process was done, all my cacao seeds were brown with different shades and seemed to be covered with a thin dry membrane (we will get to that just now). They all felt dry just like a bag with coffee seeds that is ready to be grounded.

Here is my black oven tray. I could only make this many from my healthy ripen pods. Initially I had to throw away a lot of pods that already turned black a little. I did check the seeds but they were all sprouting or germinating so I couldn’t use them.

Up close you can see the seeds have this dry membrane or outer layer that you can peel off.
Step 5 - The winnowing or removing the dry outer membrane
This part really sucks because I didn’t have a nice chopping machine to remove the dry membrane or outer shell. Also, my membrane (outer shell) ranked from easy to hard from removing it off the seeds. Do not worry if you struggle too and do not think that you have done a terrible job! In the industry, the dry bean is cracked and they use a stream of air to separate the membrane shell from the nibs. Some industries will roast with the membrane still attached and later use a machine that has a vacuum-powered wind vortex to separate the nibs and the unwanted membrane [2]. I separated the membrane from my beautiful brown seeds before I roasted them. In the beginning, I used my nails which quickly broke so I recommend you carefully and slowly use a knife to remove the membrane. Alternatively, if you are like MacGyver and have a lot of seeds you can use a Slow Juicer or a Cold Press Juicer with a big fan. Just like in the video, you put your dry seeds in the juicer. This will break the seeds into nibs and the fan blows the outer shell or the dry membrane.
The guys from Tree to Bar || How to Make Chocolate Every Step by Gabe Humphries shows what I am talking about with the usage of the Slow Juicer with the fan. The thing was I didn’t have enough seeds to do what they did (neither the slow juicer).
Nibs: Are the dry brown seed without the dry membrane. Initially, it is held together as a whole seed but when breaking with your finger the nibs fall apart. They are the smaller parts of the whole seed.

After using my nails and destroying them I got an idea… let’s use the knife instead? I would delicately remove the outer shell. This took me a while and a lot of patience.

Some of the seeds were dark brown and other had a light brown shade. I had a few of them that were grey and lighter than usual - I think they died or were off.

Once opening you finally meet what the cacao seed looks like. A range of brown shades with nibs. Notice the nibs within the seed, it is very delicate as you can break it with your fingers.

Here we can nicely see the nibs being held together forming the cacao seed.

Before the roasting begins I cracked all the seeds into a regular size nibs. I then evenly spread them on a black oven tray. You can crack the seed into nibs by just using your fingers.
Step 6 - The roasting, oh the smell of that!
This is probably a crucial part. I was anxious when I did the roasting because if I used too much time I would burn and lose all my precious nibs. During roasting, it is where all the flavour and the colour come together. The smell is absolutely out of this world and smelling that cacao smell is so rewarding. The time and temperature of the roast depend on how many nibs you have and what type of cacao seeds you have. It also depends if you roasting the seed as a whole or as smaller nibs. Roasting the nibs allows you to have more surface area and an even roast.
The roasting instructions that I found were generally between 120-180 degrees Celsius for about 10-15 minutes. I used 150 degrees Celsius for 15 minutes where halfway I turned the nibs and spaced them out evenly. I also used that time for quality control. I looked for any burnt marks and an even roasting throughout the whole tray. You bet that I was intensely watching my nibs very closely.
These two websites are very useful in dosing your temperature and time for your nibs:
The Ultimate Chocolate Blog and Cocoa Bean Roasting. I highly recommend the websites as it is worth the read. I get the general feeling that roasting the nibs or seeds becomes more like an experiment at first. It is more about touch-and-go with a lot of supervising. So have an approximate time and for the first time be there to constantly supervise. Remember do not burn them!

I roasted my nibs for a total of 15 minutes at 150 degree Celsius. The smell was amazing. It is similar to roasting coffee seeds but with a strong scent of cacao aroma. This was awesome and very rewarding.

Surveying my nibs while they are roasting. Remember they can easily burn and you don’t want to have that burnt taste.

I then moved my roasted nibs into my white dish and let them settle at a normal room temperature with a dry environment. Look at those roasting colours!
Step 7 - Grinding, conching and pressing
Normally in the industries, the milling and the friction from the heat reduces the nibs to thick chocolate colour liquid [4]. This pure and unrefined form of chocolate contains the cacao solids and the cacao butter. To get the cacao butter a hydraulic press is used to squeeze it out of the roasted nibs [2]. The cacao butter is where the fat is and makes the chocolate smoother with a glossier texture [2]. Depending on some industries, a big cylinder with two rotating wheels will grind and refine the chocolate into a very thin particle. It is at this moment where sugar or milk are added or any other flavouring agents such as vanilla. This can take up from a few hours to days and is crucial in releasing the flavour from the cacao [2].
This process is a little different and complicated. I didn’t follow procedures mainly because I didn’t have the required machinery. The guys from Tree to Bar || How to Make Chocolate Every Step by Gabe Humphries, used the Slow Juicer which seemed to be working really well. They added some cacao butter with vanilla and just crunched and milled the cacao roasted nibs to very thin particles by using the Slow Juicer (have a look on their videos for help). This seemed to be working really well!
I used a rolling pin and my own weight. It is a bit of a tedious work but I put a few roasted nibs on a chopping board and I just rolled really hard until I made a sort of paste. By just squashing and rolling the roasted nibs the cacao butter actually gets squeezed out. The nibs contain about 53-58% cocoa butter and should solidify on cooling. This is known as a “mass” or “cacao liquor” which doesn’t have alcohol in it [2,4]. My method was probably not the best but I was having too much fun. I did end up with the physical part of the nibs (or the remnants after squashing them) which I think were not ground finely enough so when I ate my chocolate there were bits in it. It still tasted very nice!

A big cylinder with two rotating wheels will grind the cacao into a thin powder. The cacao butter will also come out making a paste-like texture.
Photo 8. Credit: Fred, Grinding the Cacao, Flickr.
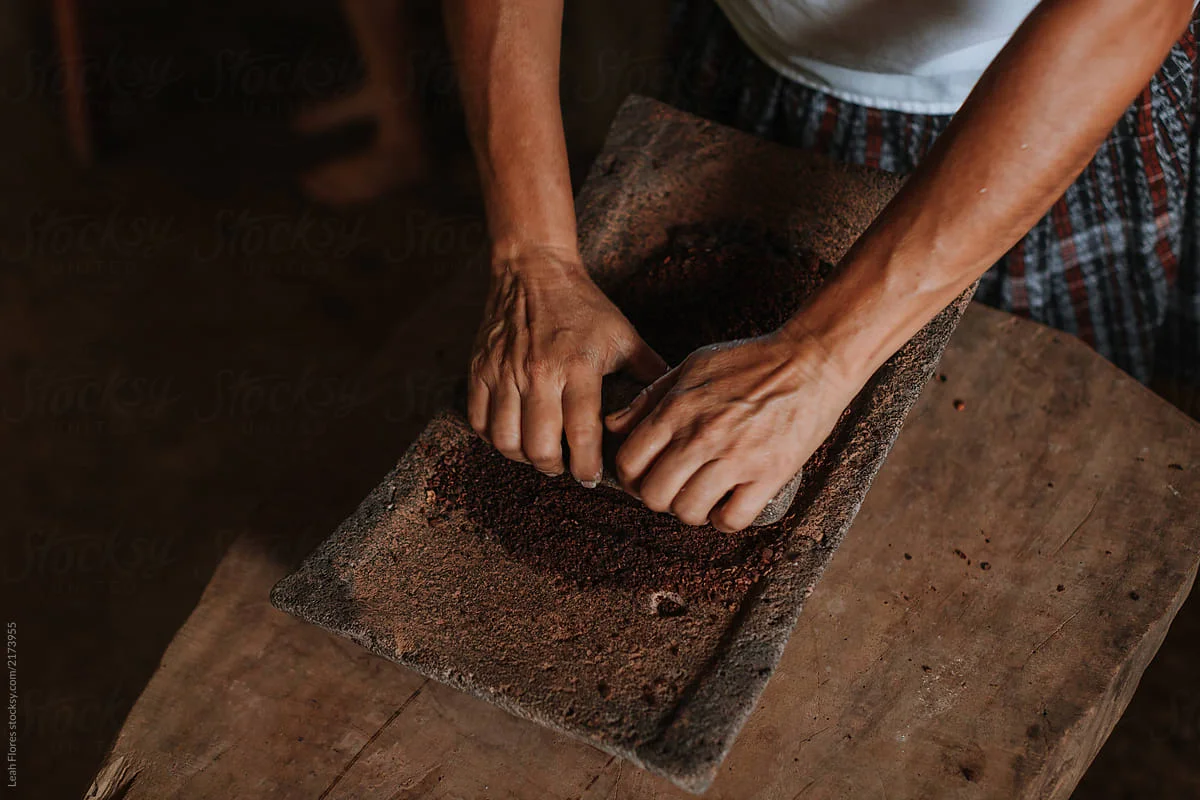
Grinding by hands is another method of extracting the cacao butter and turning the cacao into a thin powder.
Photo 9. Credit: Leah Flores, www.leahflores.com.

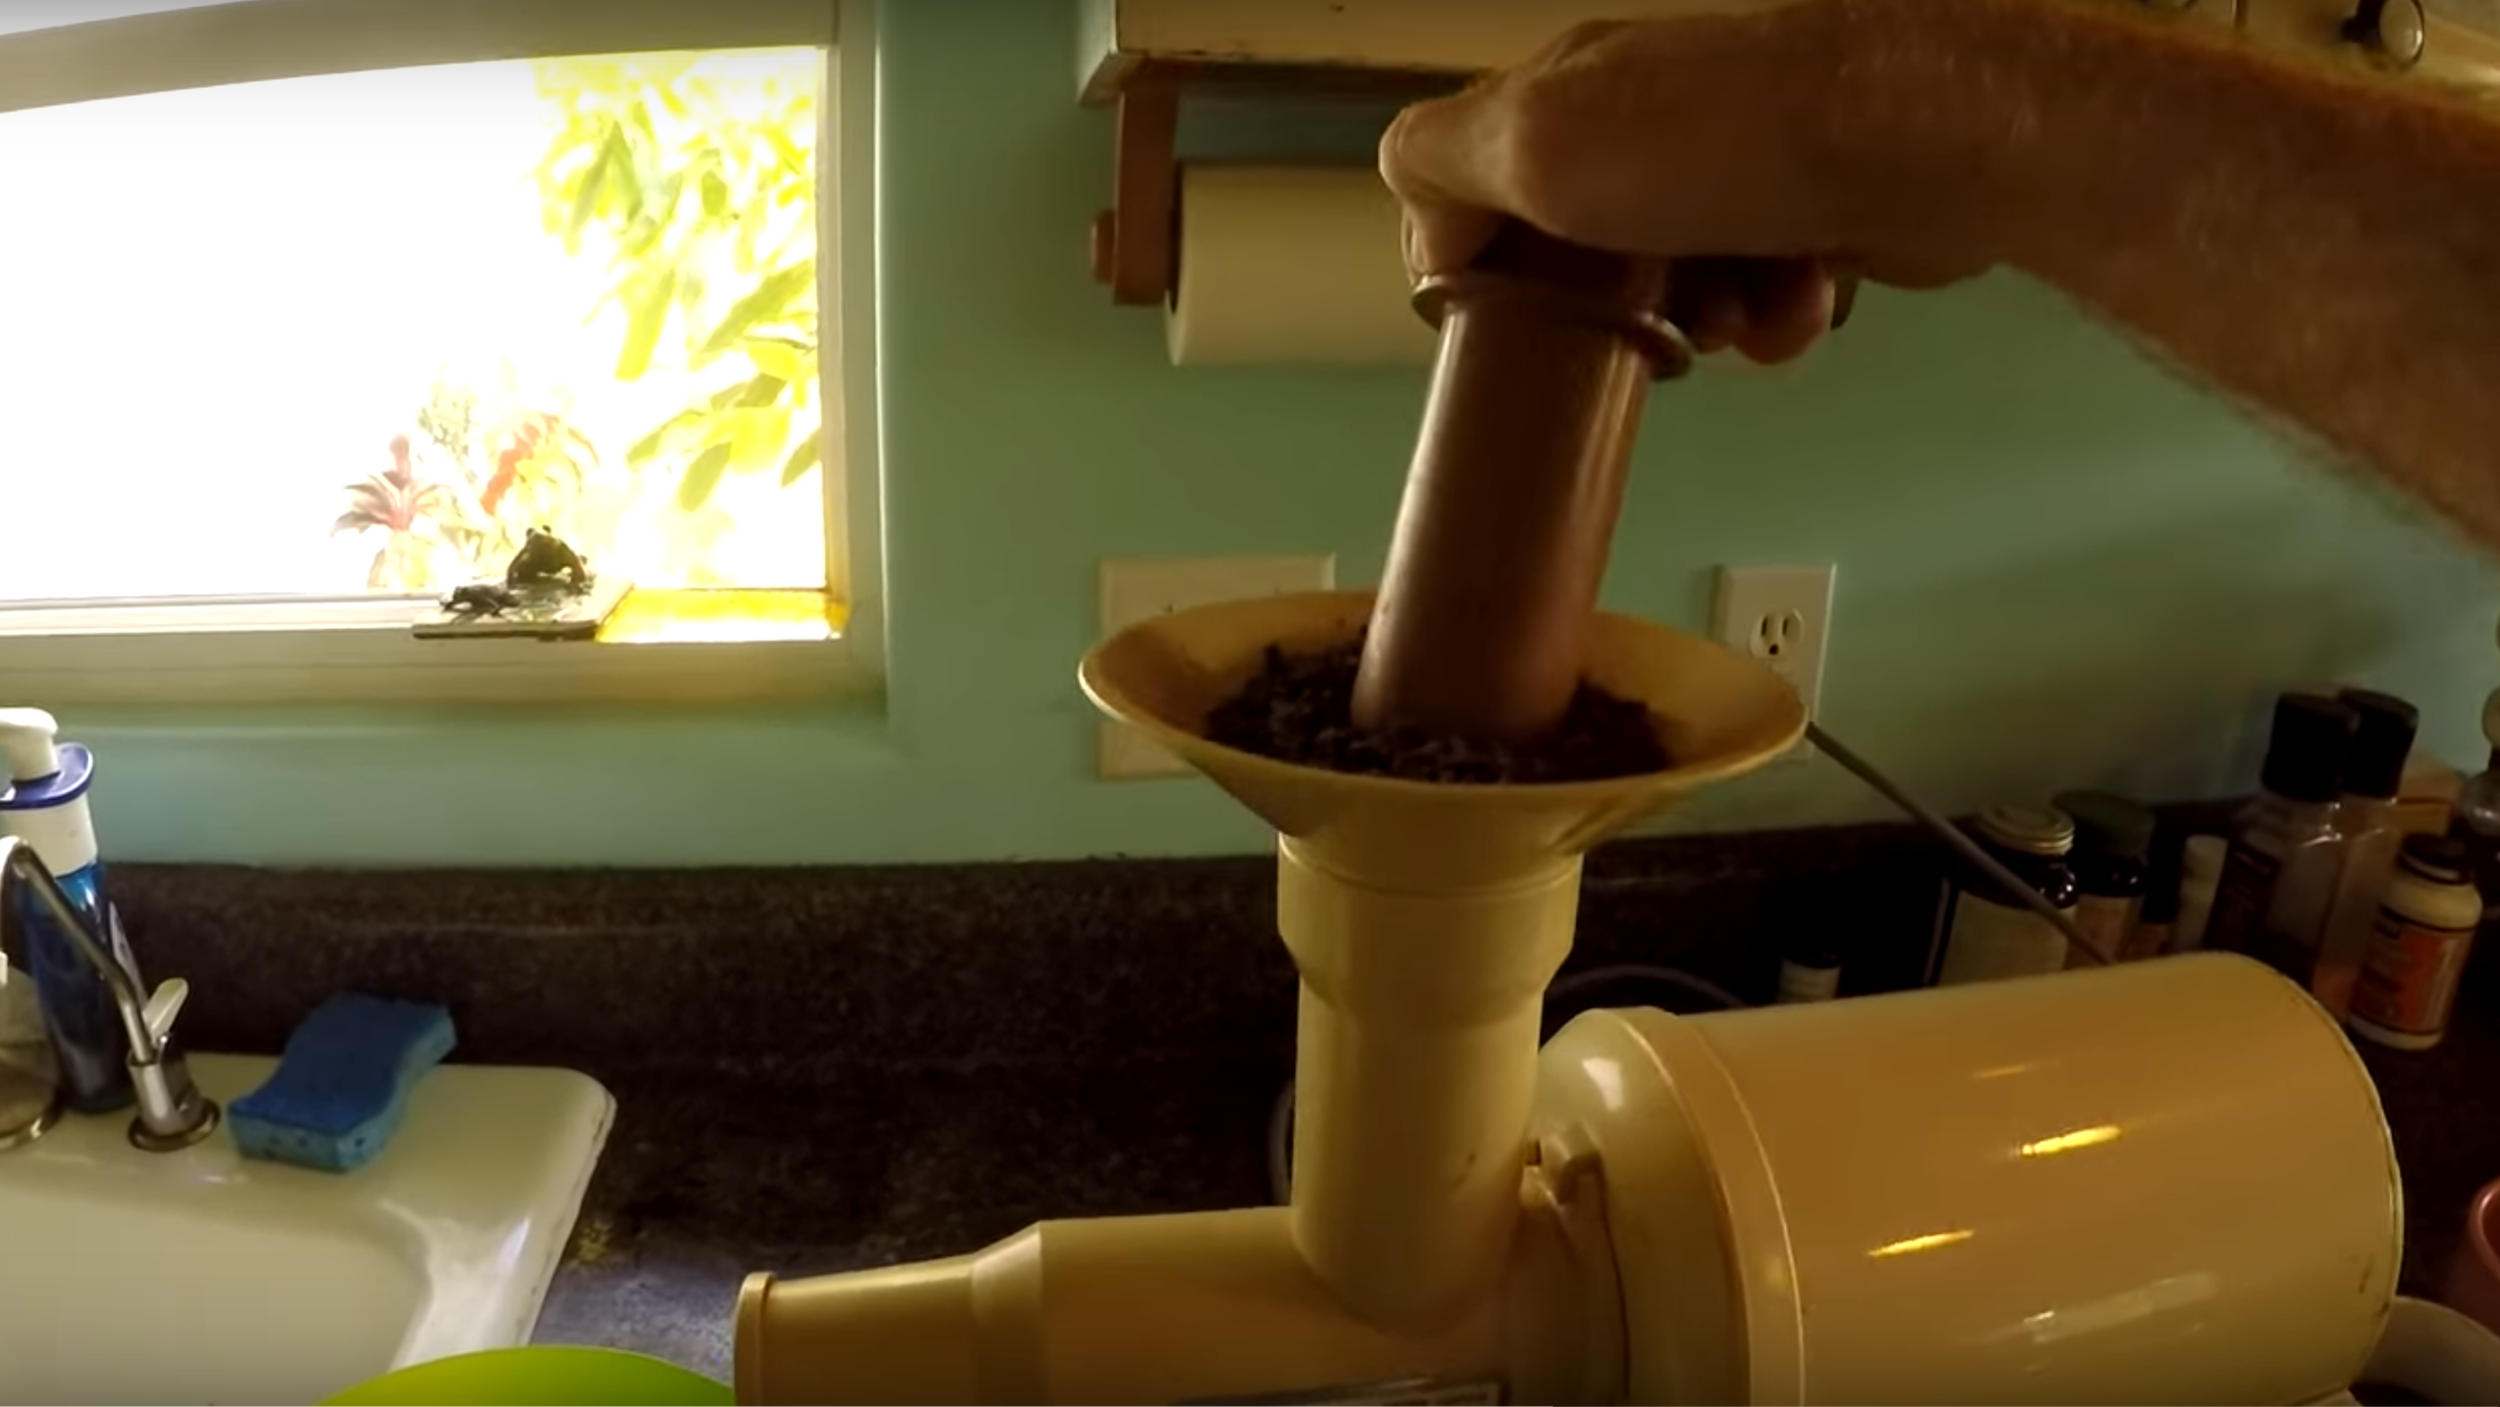
The use of the Slow Juicer works really well. Just add some cacao butter with a scent of vanilla on the top with the cacao nibs and let it grind.
Photo 10. Credit: Gabe Humphries. Published 7th December 2017.
You can use something to push down the nibs for the grinding. This method got a lot of cacao butter out of the roasted nibs.
Photo 11. Credit: Gabe Humphries. Published 7th December 2017.

My version of grinding my roasted nibs. It is a lot simpler but more difficult. I used tiny amount of nibs (I had to be very patient) and grinded as much as could with the rolling pin. The cacao nibs became a nice and thin powder which I was pleased. When I knew I had to stop is when the powder became paste-like meaning that the cacao butter was squeezed out of my nibs. Normally a hydraulic press would do that but I had no industry hydraulic press in my kitchen.
Step 8 - Making the chocolate and tempering
Tempering the chocolate is crucial. It is what gives that “crack” sound when snapping a chocolate bar. The tempering process involves the constant temperature and mixing so that crystals can form [2]. The addition of cacao butter is crucial for consistency. If there isn’t a tempering process (like what I did) then the chocolate will be soft compared to a chocolate bar and there will be no “crack” sound. Without tempering, the chocolate will melt unevenly when eating it [2].
At this stage, it really became experimental for me. Unlike the guys from Tree to Bar || How to Make Chocolate Every Step by Gabe Humphries, I did not have any cacao butter to add to my mix. I also didn’t have a mixer or a melanger that kept the chocolate at a constant temperature and mixed the chocolate homogeneously but hey it is about the journey right? Hence my tempering didn’t happen but I still had a wonderful result.
Here is what they did:
Add your chocolate liquor to the melanger. You add the sugar after the addition of the chocolate liquor which will fuse together. To the 2.5 kilograms of chocolate liquor add about 900 grams of sugar or you can do a 70% chocolate : 30% sugar ratio. Slowly add the sugar to the chocolate liquor while the melanger is on to ensure a homogeneous spread. Put the melanger on 35 degrees Celsius and leave it to mix for 12 hours (do not go lower or higher than 35 degrees Celsius). The sugar can be grinded to a thin powder before adding it to the chocolate liquor (it will help in the mixing). After 12 hours, add the cacao butter (not sure how much they added) which will start the tempering of the chocolate and give that nice “crack” sound. There shouldn’t be any water added.

The addition of sugar to the chocolate liquor.
Photo 13. Credit: Gabe Humphries. Published 7th December 2017.

Addition of cacao butter to the chocolate mixture after 12 hours.
Photo 12. Credit: Gabe Humphries. Published 7th December 2017.
Here is what I did:
After looking at many stores I soon realized I will not find cacao butter. I even thought of buying natural lip-ice as it is made from cacao butter. After all my pharmaceutics practicals during my Bachelor of Pharmacy, I was definitely going to figure something out. I decided to use normal plain butter at the cost of knowing my chocolate bar will not be very strong and I shall not get that lovely “crack” sound when the chocolate bar breaks. I decided to make a water bath and dissolve the butter while slowly adding my cacao paste. This actually worked really well and after mixing I then put it in the fridge to cool off.
After a few hours in the fridge, I got a chocolate butter flavour slab which was delicious. When I say delicious I may have over-exaggerate a little bit. It was bitter and I couldn’t eat too much as I knew I was eating almost 100% butter so I decided to melt my mix. I wanted to add sugar to it so it can be sweeter but what is sugar? Sugar is a sucrose molecule with the combination of glucose and fructose through an alpha 1,2 glycosidic bond. Sugar has lots of oxygen and hydrogen meaning that sugar has a lot of hydrogen bonds donor and acceptor (8 Hydrogen Bond Donor Count and 11 Hydrogen Bond Acceptor Count to be exact [5]). Hence sugar can dissolve readily in water or hydrophilic solutions (water-loving solutions), and what is butter with cacao paste made out of? Hint: lots of fatty and hydrocarbons chains. That’s right, you see my problem here. So how do you dissolve sugar into butter? My solution was simple but I think I just made it too complicated for myself (I am pretty sure I could have just added the sugar and it would have been fine in any case). I vaguely remember that 2 grams of sugar dissolve in 1 gram or 1 millilitre of water. I then decided to add sugar (I am not sure how much I added) to hot water. I then reduced the water just before the sugar recrystallizes and then added my mixture to the butter. All in all, I managed to make my chocolate butter sweeter but then I decided to add a milk base liquid. I added crème fraîche 50% and about 125 millilitres of it. I can actually say that it was not bad at all! Just a little strange.
So I recommend you experiment a little bit on how much sugar you add, normally you would add cacao butter for the tempering of the chocolate. I added sugar and crème fraîche as an experience and to make my chocolate more like chocolate milk.

Here I am adding my fresh cacao powder to the melted butter for a good mix.

I added the mix to a water bath trying to melt all the butter and have a good homogeneous mix. Later, I added my sugar solution and about 125 mL of crème fraîche. At this stage I just added and see what would happen.

After I finished grinding all my roasted cacao nibs, I added it to the butter. I then mixed it as best as I could but notice that it is a bit clumpy as there are still bits in it. I may have not grinded enough at the start so you want to make sure that throughout the cacao nibs are really thin and in a nice powder form.

Sucrose which is glucose and fructose attached with each other through an alpha glycosidic bond.
Step 9 - Moulding the chocolate bars and wrapping
The last step is pretty simple. When pouring, the temperature should be lowered to about 33 degrees Celsius and there shouldn’t be any water at all (unlike what I did). Just pour into a mould bar-shape and make sure to agitate the plastic mould nicely so that the air bubbles are completely out. Industries will use a specialized machine to do the shaking.
Finally, you can always wrap it old school style with a bit of foil and maybe add a printed piece of paper that has been cut out to your specification. I think that’s about it! Just store your chocolate bar in a dry area without sunlight and moisture.

This was actually my first batch (with only normal butter and cacao powder). I added the water with the dissolved sugar but notice that it didn’t mix well and hence stayed at the top in a kind of frozen state. When I added the crème fraîche it definitely looked and tasted way better.

Pouring the chocolate into the molds.
Photo 14. Credit: Gabe Humphries. Published 7th December 2017.

My chocolate bar was really dark as it was basically pure 100% cacao. Later I melted it again and added crème fraîche with sugar. It became a lot lighter and was enjoyable to eat. Still looks really cool!

There is something to packing your own chocolate bar that you have just made. This was an awesome little project coming to an end.
Conclusion
Where I could have improved:
I think I could have improved on my fermentation process to release more flavours. Next time I will add activated yeast and a bit of vinegar to start the process more strongly. If only I had cacao butter to use for the tempering and if I had a cold press juicer as well as a melanger I think I would have done a delicious and more natural chocolate bar. Next time I will not worry too much how my sugar will dissolve as I think it is better to grind the sugar thinly and then just add to the mixture. My tempering didn’t happen as I didn’t leave it to mix for 12 hours but I still had an extreme amount of fun and discovering how chocolate is made.
There is nothing more satisfying than smelling the cacao nibs being roasted. That was my highlight and to be able to crush it and taste cacao that came from my own garden was just an amazing experience. Maybe next time I go home I shall make more and give it another solid try. We all finished my chocolate over coffee and it became more like fudge towards the end. It’s still a win!
I hope you have learned a lot and enjoyed making chocolate. Let me know how yours went and what was your process! Also, do let me know if you have any funny moments!
Extra information and links
Here are extra information and links you can watch so that you can make the perfect chocolate bars. Either click on the image or on the links below.

HOW TO MAKE CHOCOLATE AT HOME bean to bar Ann Reardon, How To Cook That. Published on 21 Aug 2015.

Making Chocolate: Cacao Tree To Chocolate Bar, Gabe Humphries. Published on 4 Mar 2017.

Make fantastic chocolate from raw cocoa beans, astrojeff. Published on 30 Apr 2014.

Harvesting Cacao | How to Make Everything: Chocolate Bar, How To Make Everything. Published on 4 Feb 2016.

From the website Barry Callebaut titled “From cacao to chocolate”. Check it out!

Chocolate Cake Recipe | How to Make Homemade Chocolate Cake Without Oven by Our Grandpa For Kids, Grandpa Kitchen. Published on 30 Oct 2017.
Published 15th April 2019. Last reviewed 30th December 2021.

Reference
1. Wikipedia. Theobroma Cacao. https://en.wikipedia.org/wiki/Theobroma_cacao. Accessed March 7, 2019.
2. EHChocolatier Artisan Chocolates. The Journey From Cacao Pod to Chocolate. https://www.ehchocolatier.com/blogs/blog/making-chocolate. Accessed March 7, 2019.
3. Wikipedia. Fermentation. https://en.wikipedia.org/wiki/Fermentation. Accessed March 7, 2019.
4. Cadbury. Harvesting and processing cacao beans. https://www.cadbury.com.au/about-chocolate/harvesting-and-processing-cocoa-beans.aspx. Accessed March 7, 2019.
5. Pubchem: National Center for Biotechnology Information. Sucrose. https://pubchem.ncbi.nlm.nih.gov/compound/sucrose#section=Chemical-and-Physical-Properties. Accessed March 9, 2019.
Photo credits and where to find them:
Photo 1: Luis Ovalles, Wikipedia. http://www.flickr.com/photos/luisovalles/. Accessed March 7, 2019.
Photo 2: Keith Weller, USDA ARS - This image was released by the Agricultural Research Service, the research agency of the United States Department of Agriculture. Accessed March 7, 2019.
Photo 3: Marty Casado, Ambergriscaye. https://ambergriscaye.com/photogallery/151028.html. Accessed March 7, 2019.
Photo 4: EHChocolatier Artisan Chocolates. The Journey From Cacao Pod to Chocolate. https://www.ehchocolatier.com/blogs/blog/making-chocolate. Accessed March 7, 2019.
Photo 5: Tree to Bar || How to Make Chocolate Every Step, Gabe Humphries. Published on 7th December 2017. Accessed March 7, 2019.
Photo 6: Tree to Bar || How to Make Chocolate Every Step, Gabe Humphries. Published on 7th December 2017. Accessed March 7, 2019.
Photo 7: Tree to Bar || How to Make Chocolate Every Step, Gabe Humphries. Published on 7th December 2017. Accessed March 7, 2019.
Photo 8: Fred, Grinding the Cacao, Flickr. https://www.flickr.com/photos/telegdys/8179650079. Accessed March 7, 2019.
Photo 9: Leah Flores, www.leahflores.com. https://www.stocksy.com/leahflores. Accessed March 7, 2019.
Photo 10: Tree to Bar || How to Make Chocolate Every Step, Gabe Humphries. Published on 7th December 2017. Accessed March 7, 2019.
Photo 11: Tree to Bar || How to Make Chocolate Every Step, Gabe Humphries. Published on 7th December 2017. Accessed March 7, 2019.
Photo 12: Tree to Bar || How to Make Chocolate Every Step, Gabe Humphries. Published on 7th December 2017. Accessed March 7, 2019.
Photo 13: Tree to Bar || How to Make Chocolate Every Step, Gabe Humphries. Published on 7th December 2017. Accessed March 7, 2019.
Photo 14: Tree to Bar || How to Make Chocolate Every Step, Gabe Humphries. Published on 7th December 2017. Accessed March 7, 2019.